Remove Time From Date In Excel

Introduction to Date and Time in Excel

When working with dates and times in Excel, it’s common to encounter situations where you only need the date part, without the time. Excel stores dates and times as serial numbers, where the date is represented by the integer part and the time by the decimal part. This can sometimes lead to difficulties when trying to remove the time from a date. In this article, we’ll explore the various methods to remove time from a date in Excel.
Understanding Date and Time Serial Numbers

To understand how to manipulate dates and times, it’s essential to know how Excel represents them. The serial number for January 1, 1900, is 1, and each subsequent day increments this number by 1. Times are represented as decimal fractions of a day. For example, 12:00 PM (noon) is represented as 0.5, since it’s halfway through the day. This system makes it straightforward to perform arithmetic operations on dates and times.
Methods to Remove Time from Date

There are several methods to remove the time from a date in Excel, each with its own use cases and advantages.
Using the INT Function

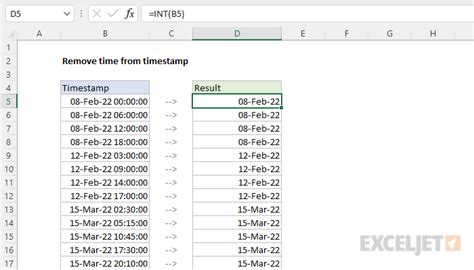
The INT function is the most straightforward way to remove the time from a date. It truncates the decimal part of a number, effectively removing the time.
- Formula:
=INT(A1) - Where A1 is the cell containing the date and time.
Using the TRUNC Function

Similar to the INT function, the TRUNC function removes the decimal part of a number. However, it provides more flexibility by allowing you to specify the number of digits to truncate to.
- Formula:
=TRUNC(A1) - Where A1 is the cell containing the date and time.
Using the FLOOR Function

The FLOOR function rounds a number down to the nearest multiple of a specified number. To remove time, you can use it with a multiple of 1, effectively achieving the same result as the INT or TRUNC functions.
- Formula:
=FLOOR(A1,1) - Where A1 is the cell containing the date and time.
Using Number Formatting
Another approach to remove the time from a date is by changing the number formatting of the cell. This method doesn’t alter the underlying value but changes how it’s displayed.
- Right-click on the cell and select “Format Cells…”
- In the Number tab, select “Custom” and enter
mm/dd/yyyy(or your preferred date format) in the “Type” field.
Choosing the Right Method

The choice of method depends on your specific needs. If you want to keep the original value intact but display it without the time, using number formatting is the best approach. However, if you need to use the date without time in further calculations, using the INT, TRUNC, or FLOOR functions is more suitable.
Common Issues and Solutions

Sometimes, after removing the time, the date might still be displayed with a time component (00:00:00). This can be due to the cell’s number formatting. Make sure to adjust the formatting to display only the date.
📝 Note: Always verify that the method you choose aligns with your subsequent calculations or data analysis needs.
To summarize the key points, we have explored various methods to remove time from a date in Excel, including using functions like INT, TRUNC, and FLOOR, as well as adjusting the number formatting. Each method has its use cases, and the choice depends on whether you want to alter the underlying value or just its display.
What is the simplest way to remove time from a date in Excel?

+
The simplest way is to use the INT function, such as =INT(A1), where A1 is the cell with the date and time.
How do I display a date without time in Excel?

+
You can right-click the cell, select “Format Cells…”, go to the Number tab, select “Custom”, and enter a date format like mm/dd/yyyy.
What’s the difference between using INT and TRUNC to remove time?

+
Both INT and TRUNC can be used to remove the time from a date. INT truncates the decimal part, while TRUNC provides more flexibility by allowing specification of the number of digits to truncate to. However, for removing time, they are used similarly.